How to Turn on Tutorial in Minecraft Windows 10 Edition
Oct 18, 2021
Susan C.
10min Read
How to Make a Minecraft Server With Hostinger, Ubuntu, Windows, and CentOS
Managing your own Minecraft server is a wonderful experience, whether you want to play with your friends or wish to build your own community of creative enthusiasts.
That's why here at Hostinger we offer dedicated Minecraft hosting services to make this goal a bit more simple and hassle-free.
In this tutorial, we will show you how to purchase one of our plans, how to configure your Minecraft server within minutes, and how to make a Minecraft server on various platforms. This way, you'll have more freedom to play the game with your own sets of rules.
How to Configure a Minecraft Server With Hostinger
Setting up a Minecraft server with Hostinger is really simple and we're going to show you how.
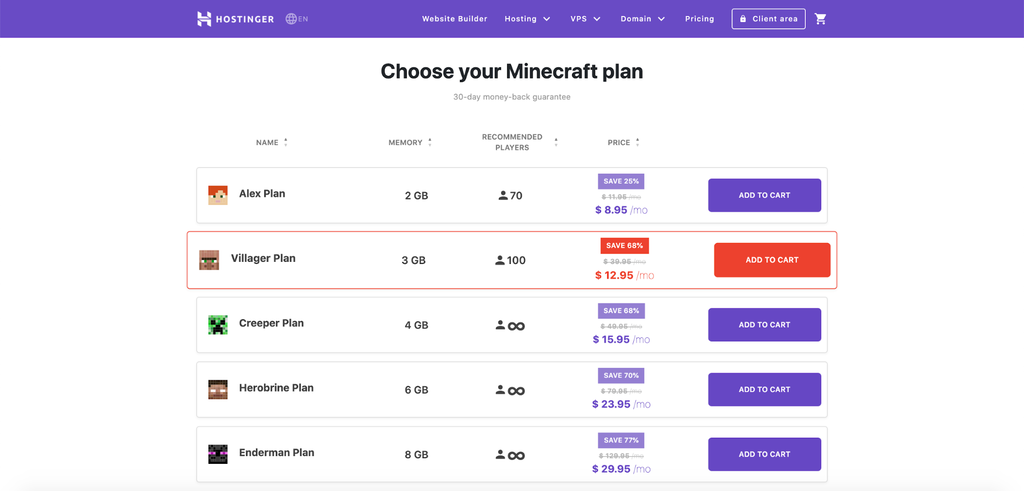
Which Minecraft Hosting Plan Is for Me?
In order to run a larger server smoothly, you need the resources to do it. Hence why we're offering five different plans to choose from according to your needs.
For example, if you want to run a server for up to 100 people without running into any hiccups, you can go for our Villager Plan that offers 3 GB of memory — that's more than enough to manage a proper Minecraft server for all of your needs and provide your friends with an enjoyable experience.
In general, the more RAM you have for your server, the more people will be able to play at the same time. If there are too many people for a server to handle, you can begin to experience lagging issues that can affect playing the game.
Furthermore, more RAM allows you to install more plugins on your server, which also takes a toll on your server speed.
To top it all off, choosing one of our plans also comes with additional features, such as instant server setup, DDoS protection, automatic off-site backups, and much more. If you'll ever get stuck, we have a 24/7 customer support team that will answer any questions you might have.
How to Make a Minecraft Server in hPanel?
Setting up a Minecraft server with Hostinger has never been easier. Once you have chosen your plan and made your purchase, log in to your Hostinger account. From there, we'll take you through the rest of the steps:
- In the hPanel, under the Setup section, you'll see your newly purchased Minecraft server ready to be set up. Click the Setup button on the right.
- Follow the given instructions, such as filling in your server name and root password, to complete the initial setup process.
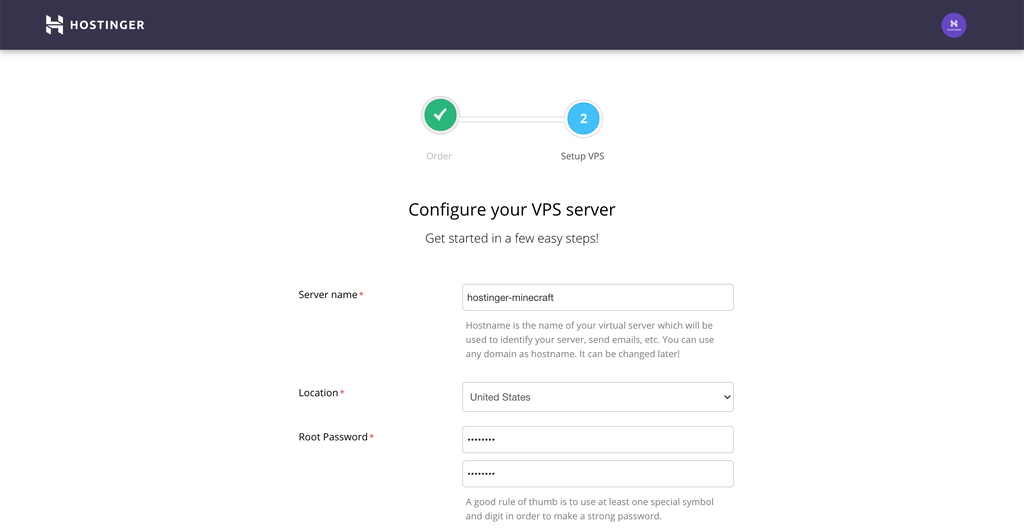
- Once that's done, you'll find your Minecraft VPS server under the VPS section in your hPanel's home screen. Click Continue to go to the Server Management screen.
- To start your newly set up server, simply click the Start button under the Server Status and wait for a couple of minutes.
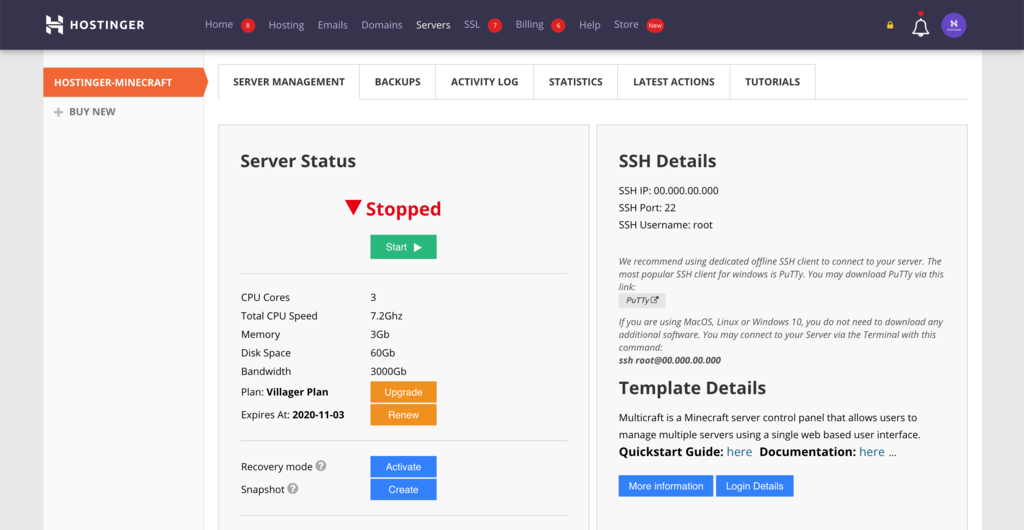
Congratulations, your Minecraft server is now live.
How to Set Up the Minecraft Control Panel – MultiCraft and Game Panel
Now, we can set up the control panel to run the server.
Hostinger offers two control panels to choose from – MultiCraft and Game Panel.
MultiCraft is a popular choice, allowing users to manage multiple Minecraft servers from a single interface. On the other hand, Game Panel is an open-source control panel for running Minecraft, Counter-Strike, Call of Duty, and Steam-based games.
Let's explore how to set each one up.
MultiCraft
First, go to the hPanel, select your Minecraft VPS server, and navigate to the Server Management tab. Then scroll down to Other settings. Make sure that the Operating system is MultiCraft Minecraft Panel.
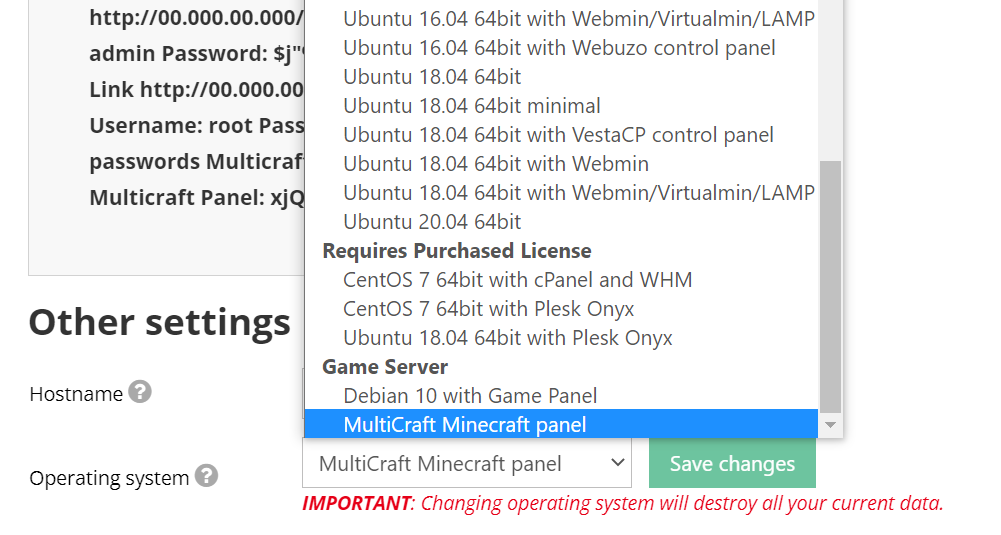
If not, switch it to MultiCraft and click Save changes. Note that this transition may take a few minutes to complete. You can see if the process has finished in the Latest Actions tab.
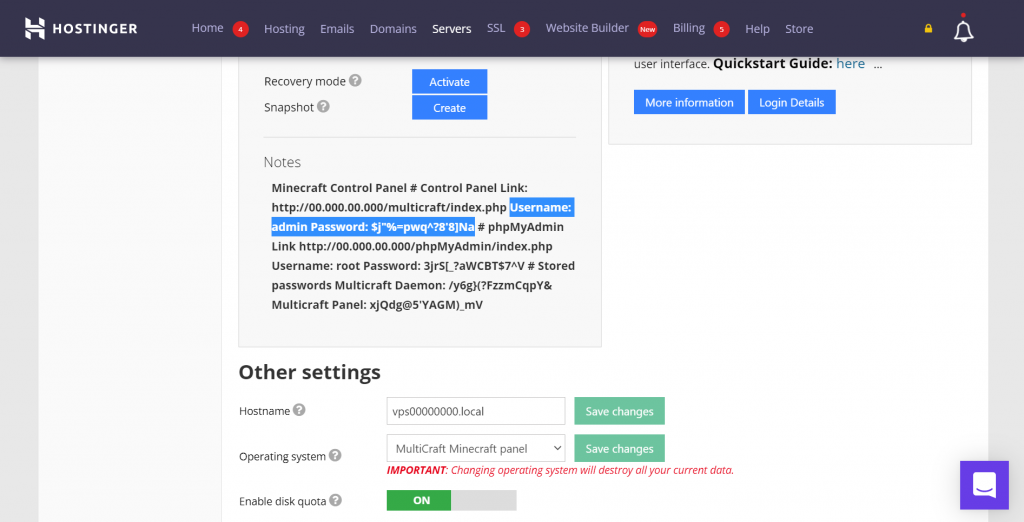
Once complete, return to the Server Management tab and go to the Notes section. You will use the control panel username and password to log in to MultiCraft.
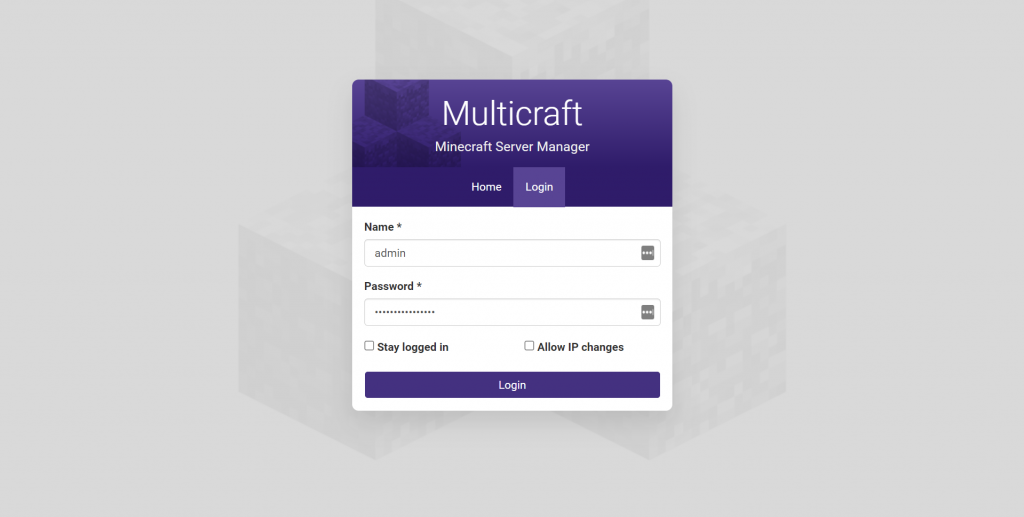
Select the blue Login Details button on the left side of the page and click on the Login URL to open the MultiCraft sign-in page.
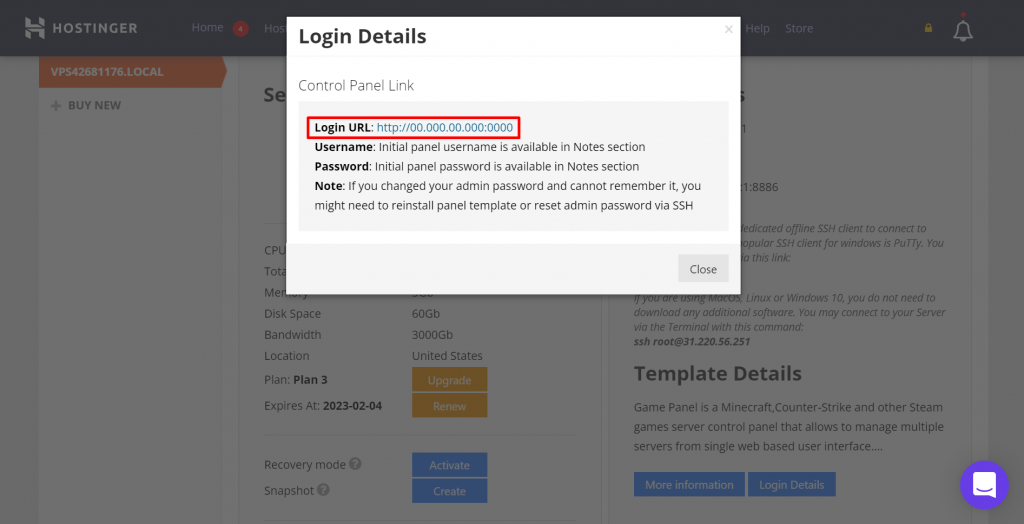
Here, copy and paste the login information you've found previously.
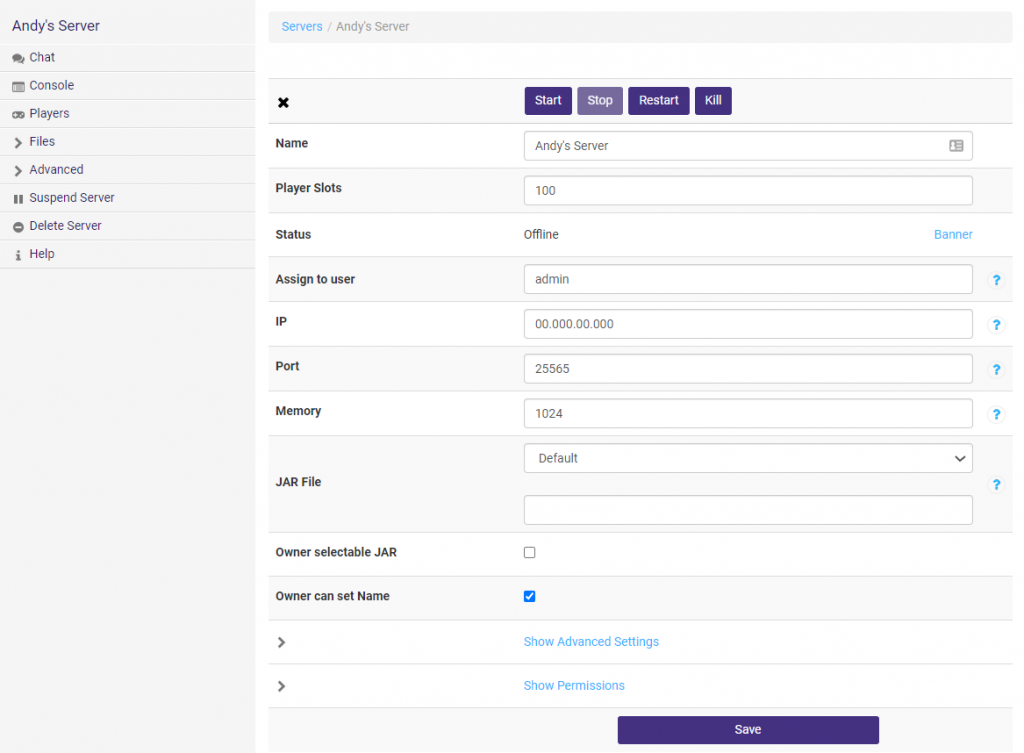
You've arrived at the Multicraft dashboard. Now, head over to the Servers tab and select Create Server.

Here, there are several fields you need to fill in:
- Type in the server's Name and Player Slots of your choice. Make sure the number doesn't exceed your Minecraft hosting plan.
- For Assign to user, specify which user to give permission to manage the server. If you want to do it yourself, simply type in admin.
- Leave IP, Port, Memory, JAR File spaces empty — the system will generate default values for you.
Press Create Server once that is done. Then click Save on the bottom and Start to make your server up and running.
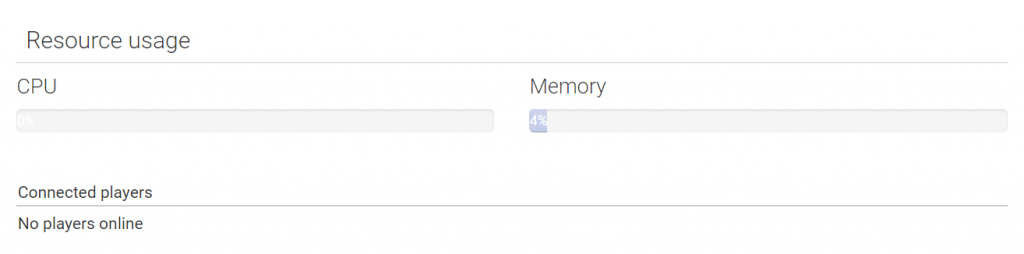
Below all the information about the server, you'll find Resource Usage to see how the server is doing and what players are currently online.
On the left side of the dashboard is access to all of the various settings for the Minecraft server.
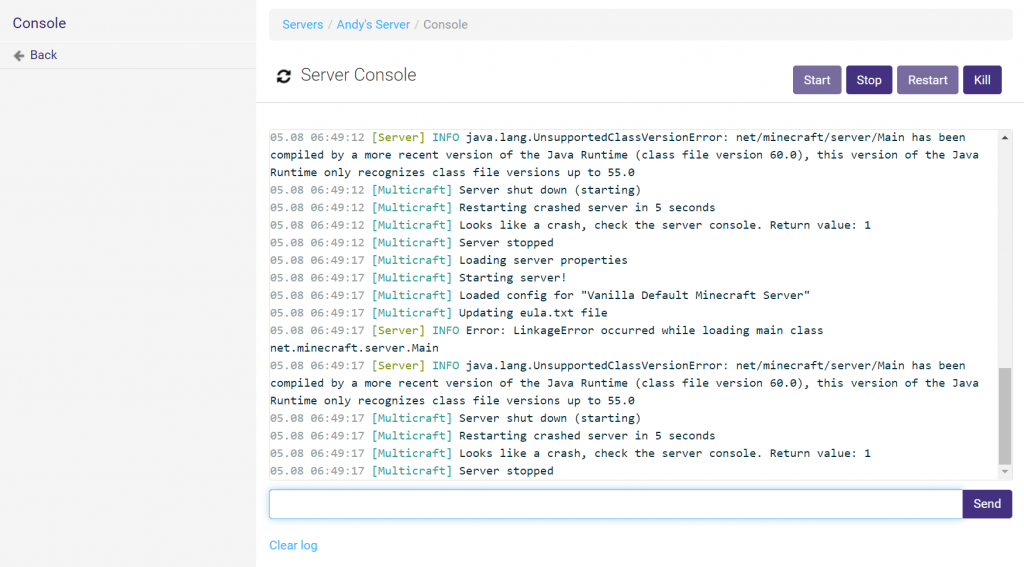
The Console is where you can preview everything that's happening on the server.
In the Players section, you can see the history of all the people that have logged in to the server. Set different roles, find players' IP addresses, or even ban players for misbehaving.
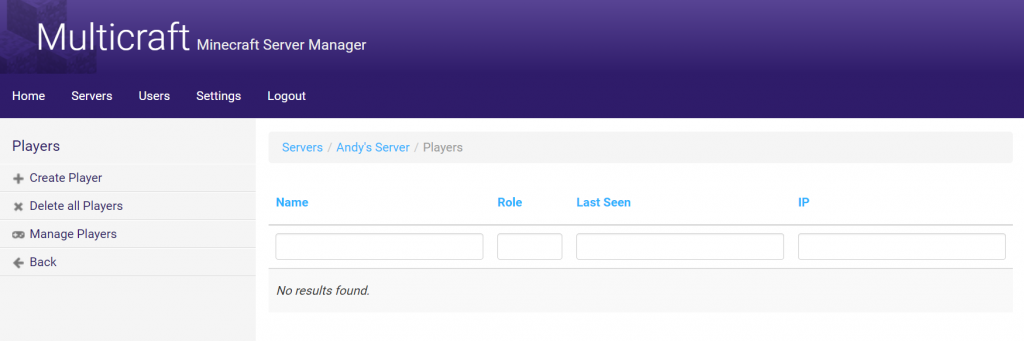
For a full list of information about all the available settings that you can change around see the official MultiCraft documentation page.
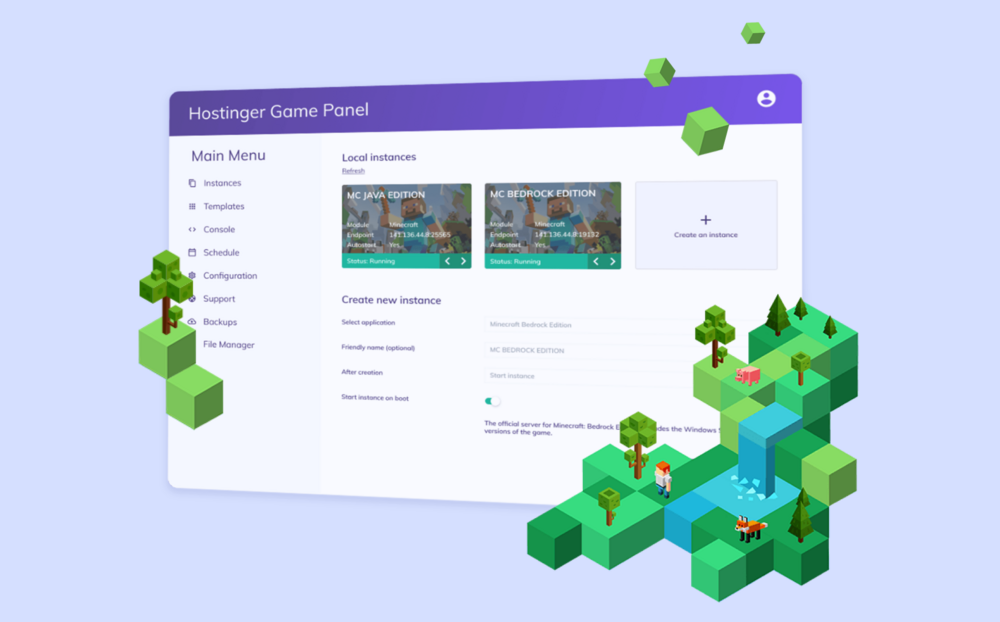
Game Panel
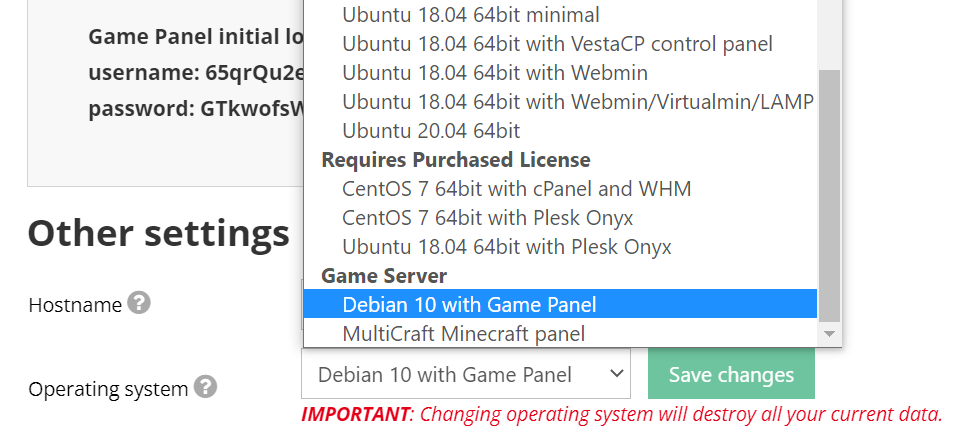
To use the Game Panel, go to the Server Management tab for your Minecraft VPS hosting account. In the Other settings section, check if the Operating system is Debian 10 with Game Panel.
Otherwise, change it, click Save changes, and wait for the transition to complete.
In the Notes section, you will find the login details to the game panel like below.
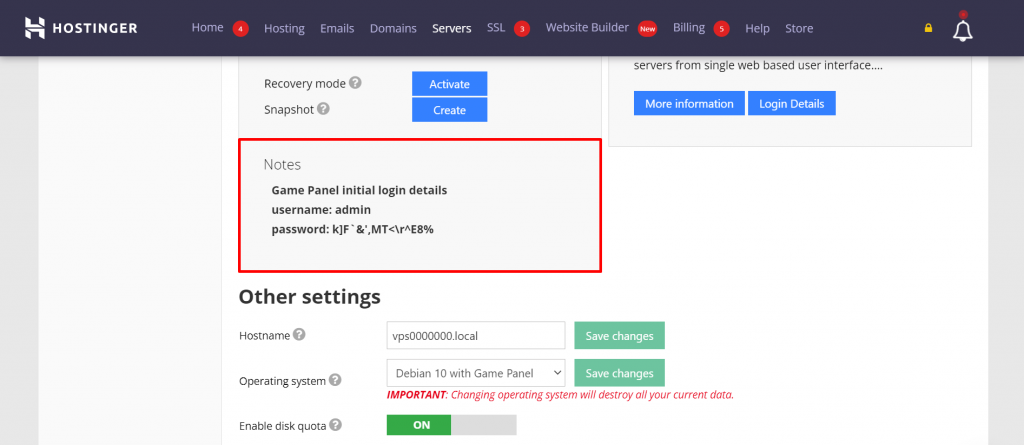
Press the Login Details button and click the Login URL to open the sign-in page.

Here, enter the login information you've found earlier.

You have landed at the homepage for the Game Panel. Click on Create Instance to set up the game.
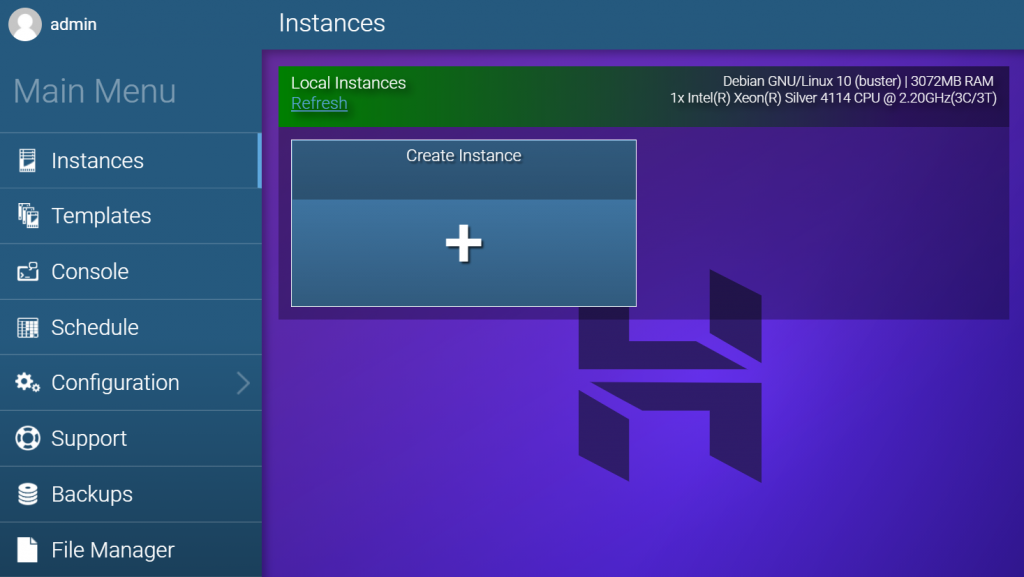
Choose the Minecraft version of your choice. For example, we will use the Java Edition. Then press Create Instance. The setup will take a few minutes.
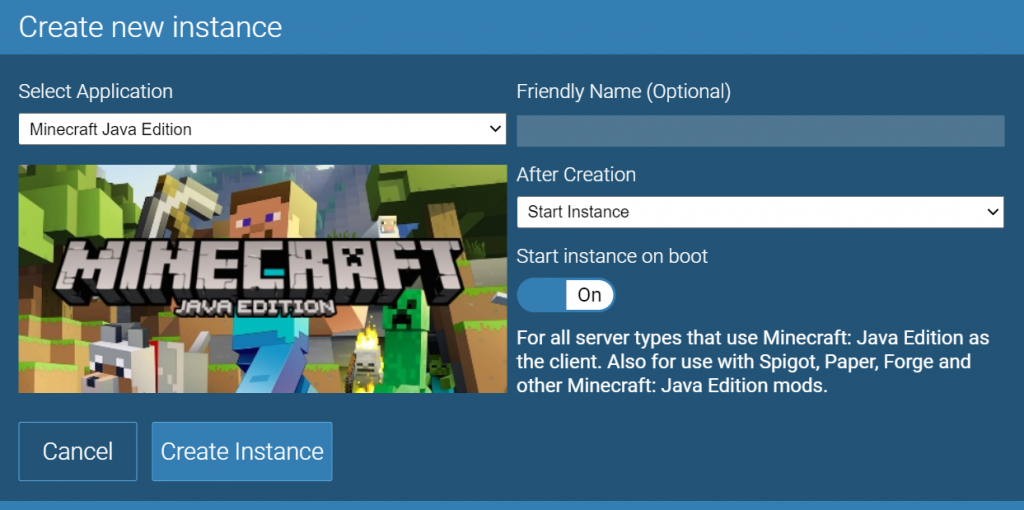
When finished, click on Manage to configure the server.
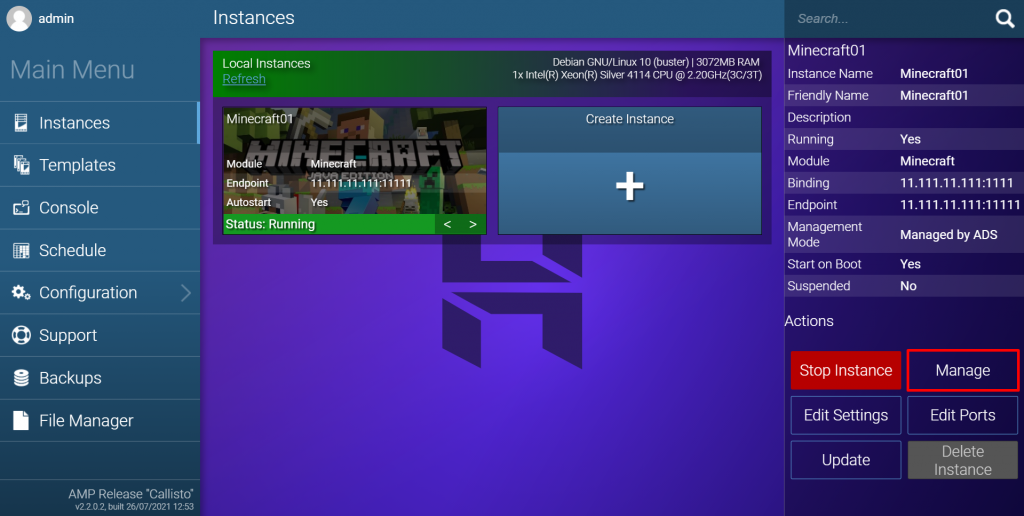
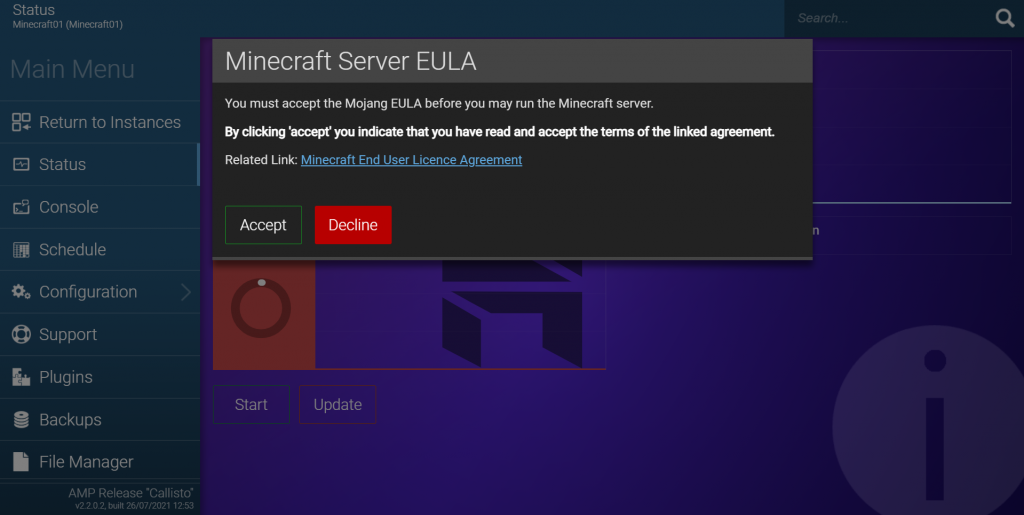
To start running the server, press the Start button. Then Accept the Mojang EULA to proceed.
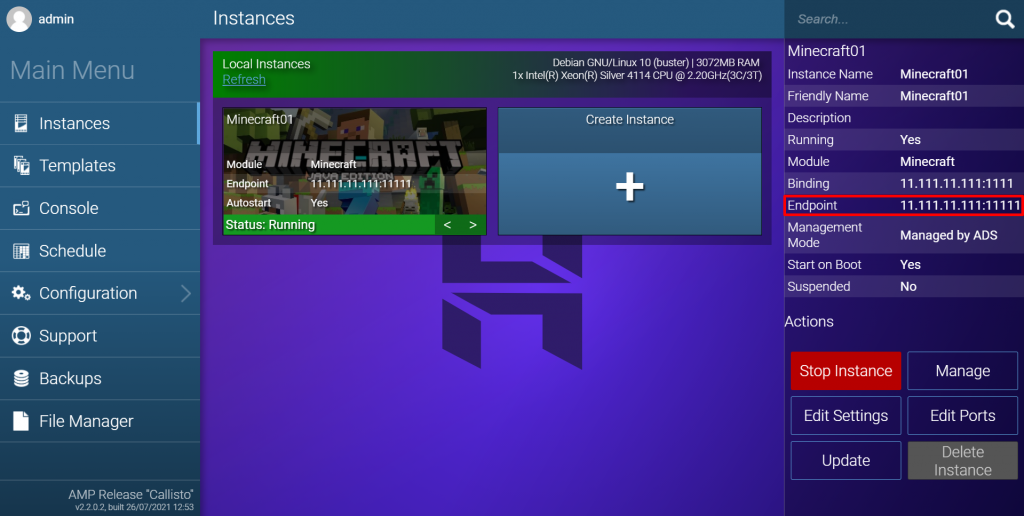
Congratulations, the server is now up and running. To access it, click Return to Instances and use the Endpoint IP address to connect to the server. More information is available on this official Minecraft documentation about playing the multiplayer mode.
How to Make a Minecraft Server on Linux?

In this section, you will learn how to make a Minecraft server on a machine that runs on Ubuntu or CentOS.
Before we start, ensure that you have a root SSH access to your machine. If you are using Hostinger's Minecraft Hosting plan, the login credentials are in the Servers tab of hPanel.
The process of creating servers for Minecraft on these two operating systems is quite similar, but there are a few differences you'll notice when installing the required packages.
1. Installing Java and Screen
Before we begin, keep in mind that the minimum operating system requirements for the following tutorial are Ubuntu 16.04 and CentOS 7.
Connect to your server via SSH. Open the built-in terminal shell (PuTTY for Windows users) and type the following command:
ssh username@ipaddress
IMPORTANT: Don't forget to change both values with your real username and server IP address. When prompted, enter your username and password.
- A Minecraft server requires Java. Therefore, check whether it's installed on your system by executing this command:
java -version
- Proceed to the second section of this tutorial if you already have Java installed. However, if Java is not found, follow the next step.
- Run these two commands to download the latest software packages and install Java:
- On Ubuntu:
Import the PPA using this command in your terminal:
          sudo          add-apt-repository ppa:linuxuprising/java -y
          sudo          apt          update
To install using the APT package manager, use the following command:
sudo apt-get install oracle-java17-installer oracle-java17-set-default
- On CentOS:
sudo yum update sudo yum install java -y
- Once Java installation is complete, you can install Screen:
- On Ubuntu:
sudo apt-get install screen
- On CentOS:
sudo yum install screen -y
2. Installing and Running Minecraft Server on Linux
Now that Java and Screen are ready, we can begin installing a Minecraft server.
- Create a new directory where you will store all your Minecraft configuration files. This step is optional, but we highly recommend it so you can keep your system organized. To do this, type:
mkdir minecraft
- Move to the newly created directory by entering:
cd minecraft
- Before we can download the required configuration files, install wget:
- On Ubuntu:
sudo apt-get install wget
- On CentOS:
sudo yum install wget -y
- Use wget command to download the Minecraft server properties file:
wget https://launcher.mojang.com/v1/objects/bb2b6b1aefcd70dfd1892149ac3a215f6c636b07/server.jar
- In this example, the latest server version is 1.15.2. You should visit this link to check if a newer version is available for download. If so, change the link for the command above.
- Run the Minecraft server properties file by entering this command. If you want to use the graphical user interface, simply remove the nogui part from the command:
java -Xmx1024M -Xms1024M -jar minecraft_server.1.15.2.jar nogui
- At this point, the server program will not start yet. Instead, it will create a EULA (end-user license agreement) file that we need to accept first.
- To accept Minecraft's EULA, open eula.txt file with Nano text editor:
sudo nano eula.txt
- Find the line that says:
eula=false
Then change it to:
eula=true
Once done, don't forget to save your changes.
- Once that is done, activate Screen so the server can run in the background:
screen -S "Minecraft server 1"
- You can change the name based on your preferences.
Good job! You have successfully installed your custom Minecraft server on Ubuntu or CentOS.
3. Running Minecraft Server
Now, we are going to run the Minecraft server for real this time. Type the following command again:
java -Xmx1024M -Xms1024M -jar minecraft_server.1.14.4.jar nogui
The minimum requirement to run the server is 1024MB (1 GB) of RAM. That's why we've entered 1024M after the -Xmx and -Xms parts. If you want to allocate more RAM, you can change the value to 2048M or above, given that your server offers such specifications.
Here's what you should see after executing the command:
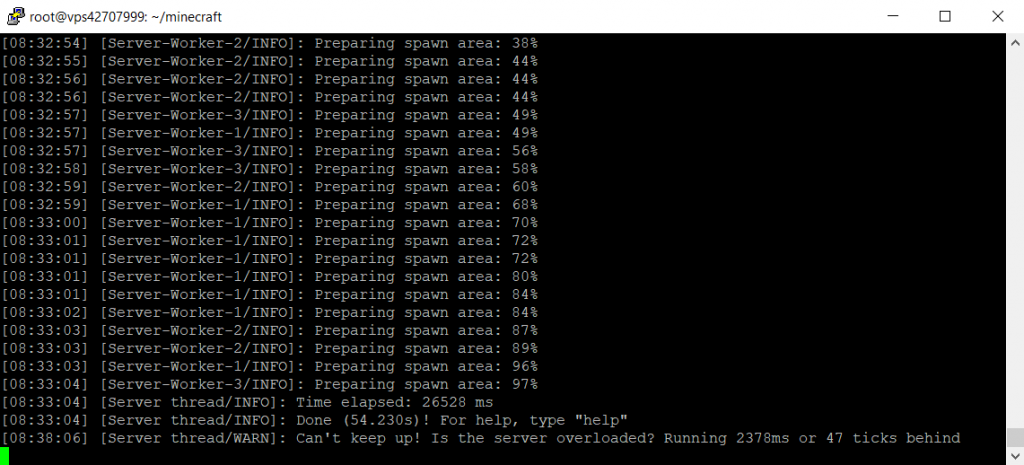
The server is now running in the background. To leave Screen, press CTRL + A, then D.
You can re-open the Screen window by typing this command:
screen -r
Should you need to customize the server settings, open the server's properties file with Nano:
nano ~/minecraft/server.properties
Nonetheless, we suggest that you stick with the default configuration to prevent any issues.
How to Make a Minecraft Server on Windows?
You can also set up a Minecraft server on your Windows PC. What's great, the steps are easier than the previous one.
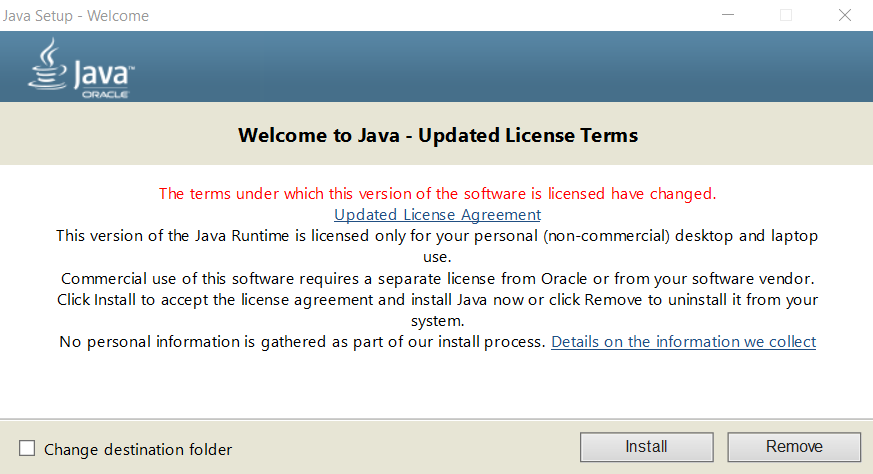
- Open the command prompt and check the Java version on your computer:
java -version
- If it matches the latest server version on the official website, you can continue to the next step. In case it's unavailable or outdated, download the installer.
- Download the setup software (.jarfile) from the official server page.
- Create a new folder for the Minecraft server and move the .jar file to that folder.
- Double-click the setup program to create a eula.txt file.
- Open the EULA file and change the value from false to true.
- Run the Minecraft server by double-clicking the .jar file. To do this, you might need to allow the program through the firewall.
Alternatively, you can open the command prompt and navigate to the dedicated Minecraft folder. For example:
cd Documents/Minecraft
Then, execute this command:
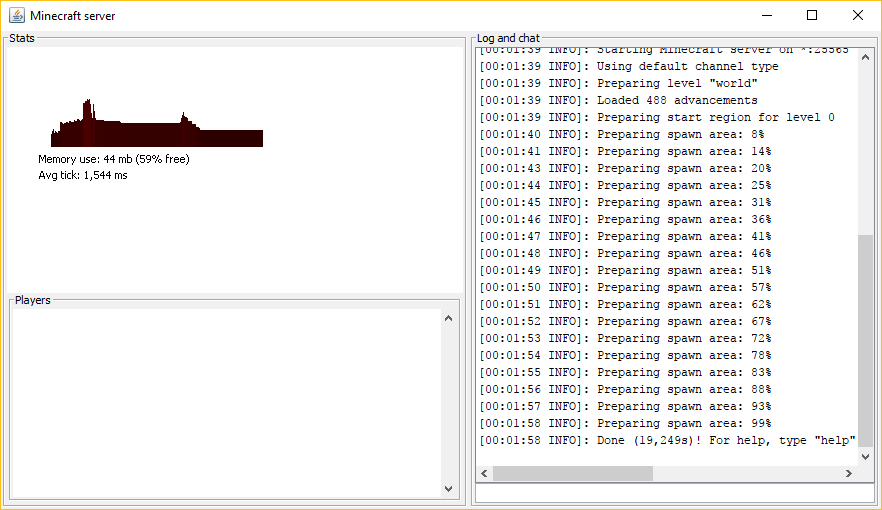
java -Xmx1024M -Xms1024M -jar minecraft_server.1.15.2.jar nogui
If you see a similar screen, it means your Minecraft server has successfully started:
How to Make a Minecraft Server on macOS?

Lastly, let's see how we can make a Minecraft server on macOS:
- Note that Java is included by default on newer versions of macOS. You can double-check by entering this command on your terminal:
java -version
- If it's not available, you may download and install a legacy version of Java from the Apple website.
- Create a dedicated folder for your Minecraft server. Then, download the Minecraft server setup program and put it in that folder.
- Open TextEdit and set the format to plain text (Format -> Make Plain Text). Paste the following line:
#!/bin/bash cd "$(dirname "$0")" exec java -Xms1024M -Xmx1024M -jar minecraft_server.1.15.2.jar nogui
- Save this file as startmc.command in the same directory where the Minecraft server file resides.
- To make startmc.command file work, the execute permission is needed. To do so, open the terminal and head to your Minecraft folder. For example:
cd Documents/MinecraftServer
- Grant the required permission using this command:
chmod a+x startmc.command
- If the steps are done correctly, you should be able to start the server by double-clicking the startmc.command file. It will open a new terminal window.
- A missing file or directory warning might appear at this time. Don't worry, this is completely normal when you run a Minecraft server for the first time.
Why You Should Make Your Own Minecraft Server?
With more than 68 million players, Minecraft remains one of the most popular video games in the world.
Minecraft offers unlimited possibilities to create a virtual world, a place where you can let your imagination loose and build some incredible pieces of work. What's great, you can take such experience to a whole new level by making your own Minecraft server.
Owning a private server gives you more control over your gameplay. You can invite your friends or other users, create your own rules, install any mods, and much more.
Unfortunately, many people think that building a private Minecraft server is difficult and expensive. However, the truth is, you only need a little bit of knowledge about the command-line interface. What's more, you can set up the server on your Windows, Linux, or macOS computer, so there's no need to buy a new machine.
If you're ready, it's time to learn how to make a server for Minecraft.
Minecraft Server FAQs
Here are some of the most frequently asked questions when it comes to Minecraft servers.
Can you make a Minecraft server for free?
Yes, you can make a Minecraft server for free, however, there are limitations.
If you sign up for free Minecraft hosting, it will most likely come with a limited amount of resources, including storage, bandwidth, and hardware. A free Minecraft plan also limits you from adding mod-packs and plugins, which can prevent users from getting the best experience.
Another choice is to self-host your server, which can come at a cost. You will need to use a high-performing PC that has to be powered at all times and a fast internet connection to prevent latency. It will also require technical knowledge to maintain and secure your server.
Thus, the best option is to choose an affordable and reliable Minecraft server hosting plan.
Do Minecraft servers make money?
The short answer – yes. As long as you comply with the Minecraft Commercial Usage Guidelines, running Minecraft servers can be profitable. There are multiple methods of monetization you can take part in, from charging server access and membership fees to asking for donations and sponsorships.
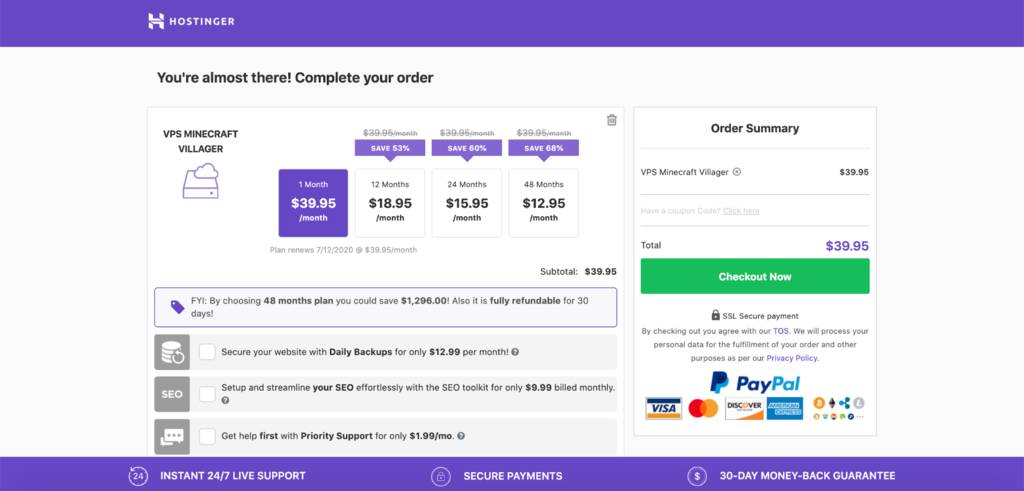
How much does it cost to run a Minecraft server?
Hostinger offers various Minecraft hosting plans ranging from $8.95 to $29.95/month. They utilize VPS servers with dedicated resources for each user.
Our plans come with a minimum of 2 GB RAM of SSD disk space, free MySQL, DDoS protection, and a 99.99% uptime guarantee. Every plan also comes with advanced protection and full root access to let you install any mod-pack and plugin you want.
Is 2 GB RAM enough for Minecraft server?
Yes, 2 GB RAM is enough to run a Minecraft server for up to 10 players. With this amount of disk space, you can install up to 10 basic mods and plugins. If paired with a CPU of at least 2 cores, 2 GB RAM can give players a smooth experience.
Conclusion
Playing Minecraft can be a great and rewarding experience, no matter your age. Owning your dedicated server allows you to enjoy it even more. Create a place where you and your friends can play whenever they want or build a strong community of avid gamers.
If you want to make Minecraft more exciting, you should consider making a private Minecraft server. You're guaranteed to have much more freedom when playing Minecraft.
Thankfully, in this article, you have learned how to make a Minecraft server on Linux (Ubuntu and CentOS), Windows, and macOS. What's great, the steps are easy to follow and won't cost you a fortune.
If you have any questions or want to brag about how you defeated the ender dragon, let us know in the comments.

Susan is a WordPress expert with a passion for marketing and SEO. She is passionate about helping people grow their online success. In her free time, Susan loves bouldering.
How to Turn on Tutorial in Minecraft Windows 10 Edition
Source: https://www.hostinger.com/tutorials/how-to-setup-minecraft-server
0 Response to "How to Turn on Tutorial in Minecraft Windows 10 Edition"
Post a Comment